
If you’ve ever stood in your kitchen staring at dull, dated cabinet doors and thought I could repaint these myself — you’re not alone. Cabinet painting is one of the most popular home improvement projects in the United States right now, and for good reason. A fresh coat of paint can completely transform a kitchen for a fraction of the cost of a full cabinet replacement, which can easily run $15,000 to $30,000 or more depending on your market.
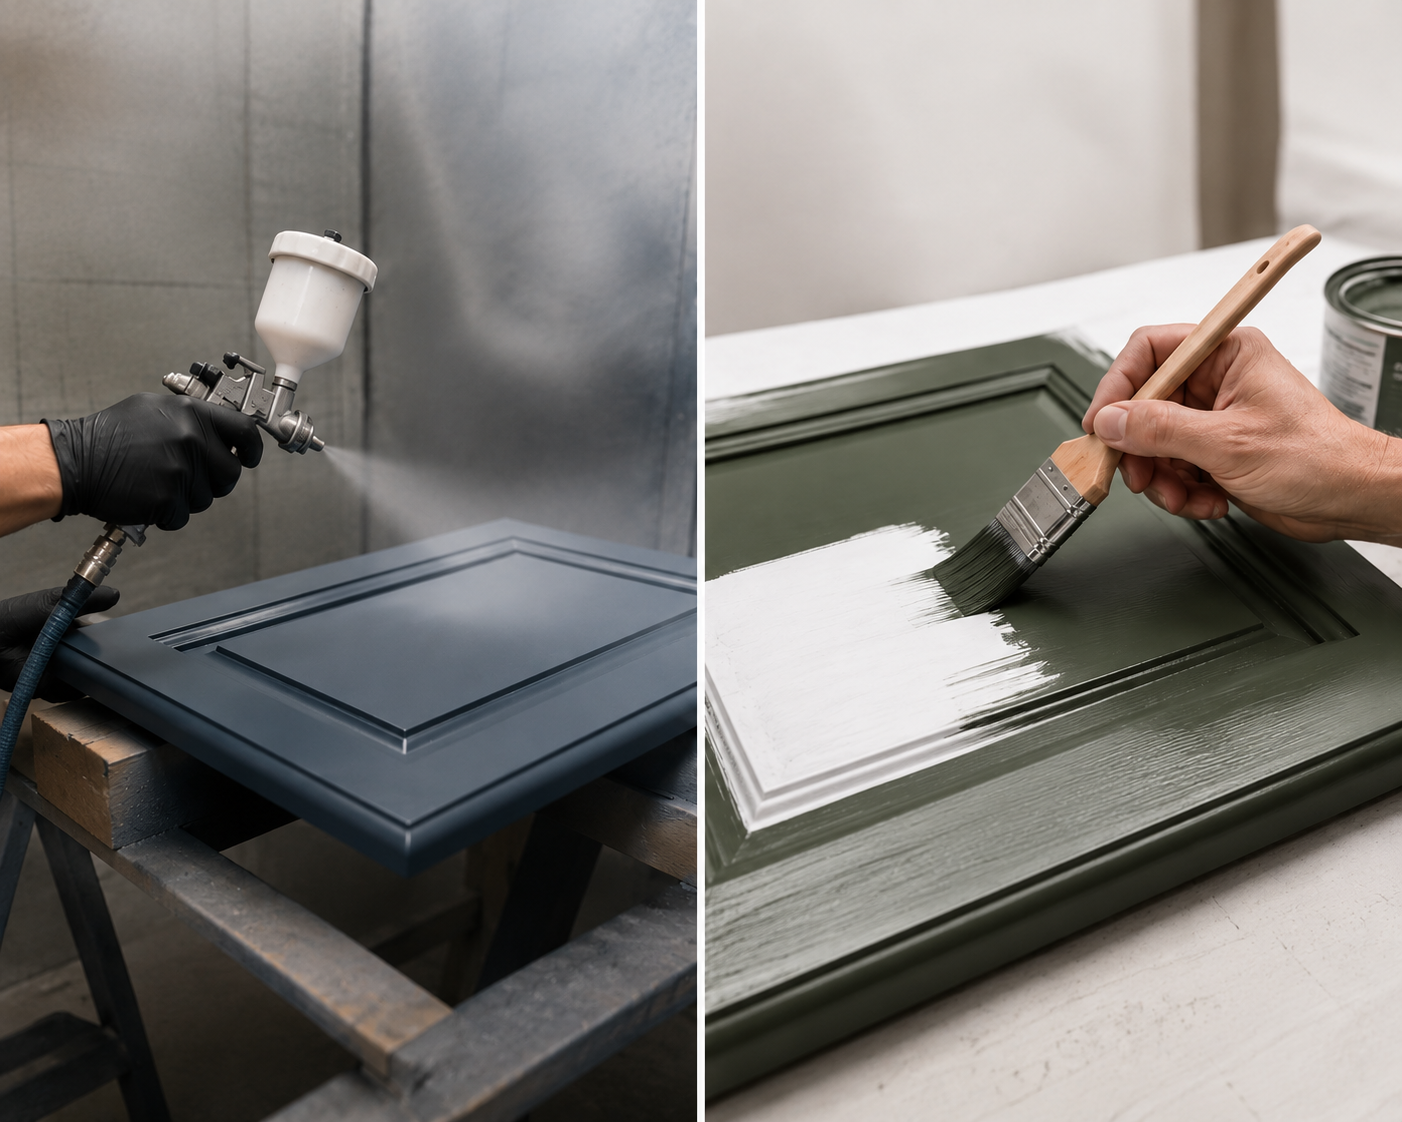
But before you crack open a can of paint, there’s a decision that will shape the entire project: do you spray or brush?
Both methods are used by professionals. Both can produce beautiful results. And both come with tradeoffs that matter enormously depending on your skill level, your space, your budget, and the finish quality you’re chasing. This guide breaks down the honest comparison — not just the surface-level pros and cons, but the real-world implications that most articles gloss over.
Why the Application Method Matters More Than You Think
Most homeowners focus on choosing the right paint color, and while that matters, the application method has an even greater influence on the final result. The reason is simple: cabinets are viewed up close, every single day, in direct light. Any imperfection — a brush stroke, a roller texture, an uneven coat, a drip — is going to be visible. And visible imperfections on cabinet doors are one of those things you simply cannot un-see once you’ve noticed them.
Professional cabinet painters will tell you that 80% of the result comes from preparation, and the remaining 20% comes from the application method. But that final 20% is what separates a finish that looks like it came from the factory from one that obviously looks painted.
Understanding what each method does — and doesn’t — deliver is essential before you commit to one approach.
What Is Brush and Roller Cabinet Painting?
Brush and roller painting is the more traditional approach, and for many homeowners it remains the most accessible. The method involves applying paint by hand using a high-quality angled brush for edges, profiles, and detail work, and a short-nap or foam mini roller for flat panel surfaces.
When done well with the right products, brush and roller painting can produce a finish that’s clean, durable, and attractive. The key qualifiers there are “done well” and “the right products” — both of which require more thought and effort than most people initially expect.
The Case for Brush Painting Cabinets
Lower upfront cost. A quality brush and foam roller setup — think Purdy or Wooster brushes, which most professional painters in the U.S. rely on — will run you $20 to $40 total. Compare that to even a budget-tier HVLP sprayer, and the savings are immediate.
Less prep and masking work. One of the most underappreciated advantages of brush painting is that it’s a localized application method. You’re not spraying atomized paint particles into the air, so you don’t need to mask off your entire kitchen, cover your countertops, seal your vents, and protect your appliances from overspray. For most homeowners, this alone represents several hours of work saved.
More forgiving of imperfect conditions. You can brush paint your cabinets in a living space without worrying about ventilation requirements, spray drift, or accidental overspray on nearby surfaces. This makes it a far more practical option for apartment dwellers or anyone without access to a garage or outdoor spray area.
Easier to learn. There is a genuine learning curve to spraying. Getting the right distance, the right pressure, the right overlap pattern, and consistent speed all take practice. Brush and roller technique, while not without its own learning curve, is significantly more intuitive for most people.
Break the project into smaller parts. With spray painting, you generally need to commit to a continuous work session because of setup and cleanup time. Brush painting allows you to work door by door, completing the project in stages over several days without major disruption to your kitchen use.
The Limitations of Brush and Roller
The honest limitation of brush painting is finish smoothness. Even with self-leveling cabinet paints like Benjamin Moore Advance or Sherwin-Williams Emerald Urethane Trim Enamel — both of which are specifically formulated to allow brush marks to flow out and flatten as they dry — achieving a truly glass-smooth finish is difficult. You can minimize brush marks significantly with the right technique and products, but you will rarely eliminate them entirely.
Roller texture is the other challenge. A foam mini roller produces a finer surface than a nap roller, but even foam rollers can leave a slight texture (sometimes called “orange peel”) on flat cabinet surfaces in certain lighting conditions. Whether this bothers you depends largely on how critical your eye is and how your kitchen’s light sources hit the cabinet faces.
What Is Spray Painting Cabinets?
Spray painting cabinets uses a paint sprayer — typically an HVLP (High-Volume, Low-Pressure) system — to atomize paint into a fine mist and apply it in thin, even layers across the cabinet surface. The result, when done correctly, is the closest you can get to a factory-applied finish: perfectly smooth, with no brush marks, no roller texture, and a consistent sheen from edge to edge.
This is why virtually every cabinet manufacturer applies finish at the factory using a spray system. The technology exists specifically because spraying produces a quality of finish that no hand application method can fully replicate.
The Case for Spray Painting Cabinets
The smoothest possible finish. This is the primary and most compelling argument for spray painting. If you want a finish that looks like it came straight from the factory — porcelain-smooth, with zero texture variation — a properly set-up HVLP sprayer is the only reliable way to achieve it. For cabinets with raised panels or decorative details, spraying gets into every crevice and contour evenly, something that brush painting cannot replicate.
Faster application time once set up. After the prep and masking are complete, actual paint application with a sprayer is significantly faster than brushing. A full set of kitchen cabinet doors that might take four to six hours to brush can be sprayed in one to two hours.
Better durability on the surface. Sprayed finishes tend to be applied more evenly, which means consistent coating thickness across the entire surface. This translates to more uniform durability — the finish wears consistently rather than being thicker in some areas and thinner in others, as can happen with hand application.
Handles complex cabinet styles better. If your cabinets have raised panels, routed profiles, beadboard details, or decorative molding, spraying is the superior choice. Getting an even, mark-free finish into inside corners and carved details by brush is difficult even for experienced painters. A sprayer handles these areas effortlessly.
The Real Costs and Challenges of Spraying
Spray painting cabinets comes with barriers that are easy to underestimate.
Equipment cost. A quality HVLP sprayer suitable for cabinet work — the Fuji Spray Semi-PRO 2 is widely regarded as one of the best for this application — runs around $500 to $600. More budget-friendly options from Wagner and HomeRight start around $50 to $100, though their finish quality and consistency with thicker paints is notably lower. If you don’t want to buy, renting an HVLP sprayer typically costs $40 to $80 for a weekend from most tool rental centers, which are widely available across the U.S. through Home Depot, Sunbelt Rentals, and similar providers.
Extensive prep and masking. Before you spray a single door, you need to protect everything you don’t want painted. In a typical kitchen, this means masking countertops, backsplash, appliances, flooring, adjacent walls, cabinet interiors, and covering HVAC vents to prevent paint particles from circulating through your home. This can take as long as the painting itself — sometimes longer.
Requires a dedicated spray space. Ideally, cabinet doors are removed and sprayed in a controlled environment: a garage, basement, or outdoor area with good ventilation. Spraying in place inside your kitchen is possible but significantly more complex and messier. Most DIYers get their best results by removing all doors and drawer fronts, spraying them flat in a separate space, and painting the cabinet boxes in place with a brush after masking everything off.
Learning curve. Achieving spray painting results that actually look better than a careful brush job takes practice. Common beginner mistakes include holding the gun too close (causing runs and drips), moving too slowly (creating thick, uneven buildup), and inconsistent overlap (resulting in visible pattern lines). Most professionals recommend practicing on scrap wood or cardboard before touching your actual cabinets.
Side-by-Side Comparison: Spray Paint vs Brush Paint Cabinets
Here’s an honest, practical comparison across the factors that matter most for a real-world cabinet project:
Finish Smoothness Spray: Near-factory smooth with no texture, the clear winner for finish quality Brush/Roller: Very good with quality self-leveling paint, but subtle texture may be visible
Prep Time Spray: Extensive — masking entire kitchen, removing all doors, setting up spray area Brush/Roller: Moderate — remove doors recommended but full-room masking not required
Application Speed Spray: Fast once set up — full kitchen in 1–2 hours of actual spray time Brush/Roller: Slower — but can be done in stages without committing to one session
Equipment Cost Spray: $50–$600 to buy (HVLP); $40–$80 to rent for a weekend Brush/Roller: $20–$40 for quality brushes and foam rollers
Skill Required Spray: Moderate to high — technique, distance, and pressure control require practice Brush/Roller: Low to moderate — more intuitive, easier to correct mistakes in real time
Best for Cabinet Style Spray: Raised panels, decorative details, routed profiles Brush/Roller: Flat-front or Shaker-style cabinets with minimal detail
Cleanup Spray: Time-consuming — sprayer must be thoroughly flushed after each session Brush/Roller: Quick — brushes and rollers wash out in minutes
Overspray Risk Spray: Significant — fine paint particles travel and settle on unmasked surfaces Brush/Roller: None — paint stays exactly where you put it
Cost Savings vs. Professional Both methods can save substantially compared to hiring a professional cabinet painter, who typically charges $1,500 to $4,500 for a full kitchen in the U.S. depending on location and kitchen size.
The Right Paint Makes Both Methods Work Better
Regardless of whether you spray or brush, the paint you choose has a massive impact on the final result. Standard wall paint is not appropriate for cabinets — it’s formulated to be scrubbable, not hard and durable like cabinet surfaces need to be.
For any cabinet project, use paint specifically formulated for cabinetry and trim:
Benjamin Moore Advance (Waterborne Alkyd): One of the most widely recommended cabinet paints among professional painters across the U.S. It has excellent self-leveling properties that minimize brush marks, dries to a very hard finish, and is available in thousands of colors. It performs well with both brush and spray application.
Sherwin-Williams Emerald Urethane Trim Enamel: Another professional-grade option that dries exceptionally hard and resists chipping, moisture, and kitchen grease. Its thick consistency sprays beautifully with an HVLP and also brushes out with minimal mark-in.
Rust-Oleum Cabinet Transformations: A budget-friendly option available at most Home Depot and Lowe’s locations across the country. Better suited for brush application than spraying, and a solid choice for homeowners who want good results without premium paint pricing.
The finish sheen matters too. Semi-gloss is the traditional choice for cabinets — it’s easy to clean and has a bright, slightly reflective look. Satin is increasingly popular for a more modern, understated appearance and does a better job of hiding minor application imperfections, making it particularly forgiving for brush and roller projects.
Preparation: The Step That Determines Everything
Here’s the truth that most “spray vs brush” conversations skip over: the preparation stage matters more than the application method. A beautifully sprayed finish over poorly prepared cabinets will fail. A carefully brushed finish over properly prepared cabinets will last a decade or more.
Regardless of which method you choose, this prep sequence applies:
1. Remove doors and hardware. Label every door and its corresponding hinge location with numbered tape before you remove anything. Taking 10 minutes to do this will save you significant confusion during reassembly.
2. Clean thoroughly with TSP or a degreaser. Kitchen cabinets accumulate cooking grease, fingerprint oils, and food residue that are invisible to the naked eye but will prevent paint from adhering properly. Trisodium phosphate (TSP) solution or a quality degreaser wipe-down is essential. This step is non-negotiable.
3. Sand lightly with 150-grit sandpaper. You’re not removing the existing finish — you’re scuffing the surface to give the primer mechanical grip. A light pass with a sanding sponge or 150-grit paper is sufficient.
4. Apply a bonding primer. Shellac-based primers like Zinsser BIN or bonding primers like Stix by Insl-X are the industry standard for cabinets. They adhere to slick, previously finished surfaces without requiring aggressive sanding and provide a uniform base for topcoats.
5. Sand between coats. After the primer dries, lightly sand with 220-grit before applying paint. Between paint coats, a light sand with 320-grit or a fine sanding sponge knocks down any raised grain or dust nibs, giving you a progressively smoother surface with each coat.
For deeper guidance on surface prep and primer selection, the Bob Vila home improvement resource offers detailed step-by-step instructions on cabinet painting prep that many American DIYers have found valuable.
Which Method Should You Choose?
There’s no universally correct answer — the right choice depends on your specific situation. Here’s a practical decision framework:
Choose spray painting if:
- You want the smoothest, most professional-looking finish possible
- Your cabinets have raised panels, routed details, or decorative profiles
- You have access to a garage or outdoor spray area
- You’re comfortable investing in or renting an HVLP sprayer
- You have time to do extensive masking and prep before starting
Choose brush and roller painting if:
- You want to minimize upfront equipment cost
- Your cabinets are flat-front or Shaker-style with minimal detail
- You’re working in an apartment or home without a dedicated spray space
- You prefer working in stages over several sessions rather than one marathon setup
- This is your first cabinet painting project and you want a more forgiving method to learn on
Consider hiring a professional if:
- Your cabinets are in poor condition and need significant repair before painting
- You want a spray finish but don’t have the time or space to do it yourself
- The kitchen represents a major resale investment and you want guaranteed quality
In many American markets — particularly in high-cost-of-living cities like San Francisco, Boston, New York, and Chicago — professional cabinet painting can actually offer surprisingly good value compared to a full replacement, and the finish quality from an experienced sprayer will consistently outperform even a careful DIY spray job.
Pro Tips for Getting the Best Finish Either Way
A few techniques that make a real difference regardless of which method you use:
Always apply two thin coats rather than one thick coat. Thick single coats are the most common cause of drips, runs, and uneven finish. Two thinner coats, with proper drying time and a light sand between them, will always look better.
Paint in the right conditions. Ideal conditions for cabinet painting are 65°F to 75°F with moderate humidity. Painting in very cold or very hot conditions, or on humid days, affects drying time and can cause adhesion problems. Many American homeowners find late spring and early fall ideal for cabinet projects.
Work from the inside out, top to bottom. Whether spraying or brushing, always paint interior cabinet surfaces before exterior faces, and work from the top of the kitchen down to avoid dripping onto already-painted surfaces.
Let paint cure fully before reinstalling doors. Paint may feel dry to the touch within hours, but full cure — where the finish reaches maximum hardness — typically takes two to four weeks for cabinet enamels. Reinstalling doors too early and closing them repeatedly before the paint has cured is one of the most common causes of doors sticking or the finish pulling off around edges.
For more guidance on related painting projects around your home, check out our complete interior painting guides for tips on walls, trim, and specialty surfaces.
The Bottom Line
When it comes to spray paint vs brush paint cabinets, the honest answer is this: spray painting wins on finish quality, brush painting wins on accessibility and simplicity. Neither is the wrong choice — they’re different tools for different circumstances.
If your primary goal is a result that looks genuinely professional and you have the patience to set up properly, a good HVLP sprayer will give you a finish you’ll be proud of every time you walk into your kitchen. If you want a practical, cost-effective transformation that’s accessible to any motivated homeowner, a careful brush and roller job with premium self-leveling paint will give you results that are impressive in their own right.
Either way, the preparation you put in before the first drop of paint is applied will determine more about the final result than any other single factor. Get that right, choose quality paint, and both methods will serve you well for years.