
If you’ve ever walked downstairs after a heavy rainstorm and found damp walls, puddles near the corners, or that unmistakable musty smell — you already know what water intrusion feels like. And if you’ve tried painting over it or stuffing hydraulic cement into cracks only to watch the problem return a season later, you’re not alone.
Here’s the hard truth: most quick fixes treat the symptom, not the cause. Waterproofing basement walls from the outside is one of the most effective long-term solutions because it stops water before it ever touches your foundation. In this guide, we’ll walk you through exactly how it works, when it makes sense, what it costs in 2026, and how to do it right — whether you’re a hands-on homeowner or planning to hire a contractor.
Why Exterior Waterproofing Is Different from Interior Methods
Most homeowners instinctively look inside when their basement gets wet. That’s understandable. Interior solutions like sump pumps, French drains, and wall sealants are less invasive and more affordable — and in many cases, they work just fine.
But there’s a key distinction worth understanding: interior systems manage water after it enters your basement; exterior systems prevent water from reaching your foundation in the first place.
Think of it this way. If your roof had a leak, you wouldn’t just put buckets on the floor indefinitely. At some point, you’d fix the roof. Exterior waterproofing is fixing the roof.
For homes with chronic water intrusion, severe hydrostatic pressure (water pressure in the surrounding soil pushing against your walls), or foundation cracks that reopen season after season — exterior waterproofing is often the only real solution.
Signs Your Basement Needs Exterior Waterproofing
Before you spend a dollar on any solution, it helps to know what you’re dealing with. Here are the most common warning signs that your problem is coming from outside the foundation:
- Water stains low on the walls, especially near the floor-wall joint
- Efflorescence — that white, chalky mineral deposit on concrete or block walls (a telltale sign of water migrating through from outside)
- Bowing or cracked foundation walls due to soil pressure
- Water intrusion that worsens during heavy rain or snowmelt, particularly in spring
- Mold or mildew smell even when the basement appears dry
- Previous interior fixes that keep failing — if sealants or coatings have already peeled off or cracked, the pressure from outside is simply too great for interior methods to hold
A quick diagnostic tip: tape a 12-inch square of aluminum foil to a damp wall with waterproof tape, seal all four edges, and leave it for 48 hours. If the back of the foil (the side against the wall) is wet, your moisture is coming from outside. That confirms exterior waterproofing is what you need.
Understanding Hydrostatic Pressure: The Real Enemy
One of the biggest misconceptions homeowners have is thinking water just seeps through cracks by accident. In reality, the more serious culprit is hydrostatic pressure — the physical force of water-saturated soil pressing against your foundation walls.
When heavy rain saturates the ground around your home, or when snow melts in spring, the soil acts like a saturated sponge. That water has to go somewhere. And if your foundation is the path of least resistance, it will find its way through — through micro-cracks, mortar joints, porous concrete spots, or the wall-floor joint called the cove joint.
Homes in clay-heavy soils (common across the Midwest, Southeast, and parts of the Northeast) are especially vulnerable because clay holds water longer and expands when wet, exerting tremendous pressure on foundation walls. If you’re in areas like Chicago, Columbus, Atlanta, or Nashville — regions known for clay-rich soil — this is particularly relevant to you.
Exterior Waterproofing Methods Explained
There’s no single “exterior waterproofing” — it’s actually a combination of several approaches used together. Here’s a breakdown of each method, how it works, and when it applies.
1. Excavation and Waterproof Membrane Application
This is the most comprehensive exterior waterproofing method available, and for severe cases, it’s the gold standard.
The process involves digging down around the perimeter of your foundation — all the way to the footing, which can be 6 to 8 feet deep in a full basement.
There are two main types of membranes:
- Liquid-applied membranes (rubberized asphalt or polyurethane): Sprayed or rolled onto the wall in multiple coats. These are flexible, bond directly to concrete or block, and seal porous spots and minor cracks. They typically last 20 to 30 years.
- Sheet membranes (HDPE drainage boards): Pre-manufactured sheets that are fastened to the wall. They also serve a dual function as a drainage plane, directing water downward toward the footing drain rather than letting it build up against the wall.
Who it’s best for: Homes with severe or recurring water intrusion, foundation cracks, porous concrete, or deteriorating mortar joints. Also ideal for new construction, where access is easy and no landscaping needs to be disturbed.
2. Exterior French Drain (Footing Drain)
An exterior French drain — also called footing drain or drain tile — is installed at the base of the foundation, right next to the footing. It consists of a perforated pipe surrounded by gravel, wrapped in filter fabric to prevent clogging.
Most new homes built in the U.S. after the 1980s have some form of this system installed. Older homes, particularly those built before the 1960s, often do not — and adding one is one of the most effective exterior waterproofing upgrades available.
3. Proper Grading and Landscape Drainage
This is the most overlooked exterior waterproofing step — and sometimes, it’s the only one you need.
The ground around your foundation should slope away from your home at a rate of at least 6 inches over the first 10 feet. If the grade is flat or slopes toward the house, every rainfall becomes a funnel directing water straight to your foundation walls.
In many cases, homeowners add compacted soil and slope it away themselves. Professional regrading typically runs $1,000 to $5,000 depending on the amount of work involved.
Equally important: your gutters and downspouts. Clogged gutters overflow and dump water directly against your foundation. Downspout extensions should deposit water at least 4 to 6 feet from the house — ideally into a buried drainage pipe that channels it even further away.
It’s not glamorous, but fixing grading and downspouts has solved basement moisture problems for thousands of American homeowners without a single shovel of excavation.
4. Window Well Covers and Drainage
Basement window wells are a surprisingly common entry point for water, especially in older homes. When window wells fill with rainwater or debris, water can pool directly against the foundation wall and force its way through the window frame or surrounding concrete.
Installing window well covers (clear plastic dome covers) and ensuring the well has a gravel base with a drain pipe running to the footing drain system eliminates this problem entirely. It’s a straightforward, low-cost fix that should be part of any comprehensive exterior waterproofing plan.
Step-by-Step: How Exterior Waterproofing Is Done
Whether you’re hiring a contractor or trying to understand the full process, here’s what exterior basement waterproofing looks like from start to finish:
Step 1 — Assessment and Diagnosis A qualified waterproofing professional (or a thorough homeowner) inspects the exterior perimeter, assesses grading, checks gutters and downspouts, and identifies the source of water entry. Interior inspection identifies where water appears, which helps confirm the exterior source.
Step 2 — Utility Locating Before any digging begins, call 811 (the national “Call Before You Dig” service in the U.S.) to have underground utilities marked. This is legally required and keeps the job safe.
Step 3 — Excavation Soil is removed around the foundation walls using an excavator or by hand in tight spaces. Excavation typically extends to the footing level — often 6 to 8 feet down. The trench needs to be wide enough for workers to operate safely, usually 3 to 4 feet wide minimum.
Step 4 — Wall Cleaning and Crack Repair Once the foundation wall is exposed, it’s cleaned with a pressure washer or wire brush. Any visible cracks are repaired using hydraulic cement or polyurethane foam injection before the membrane is applied.
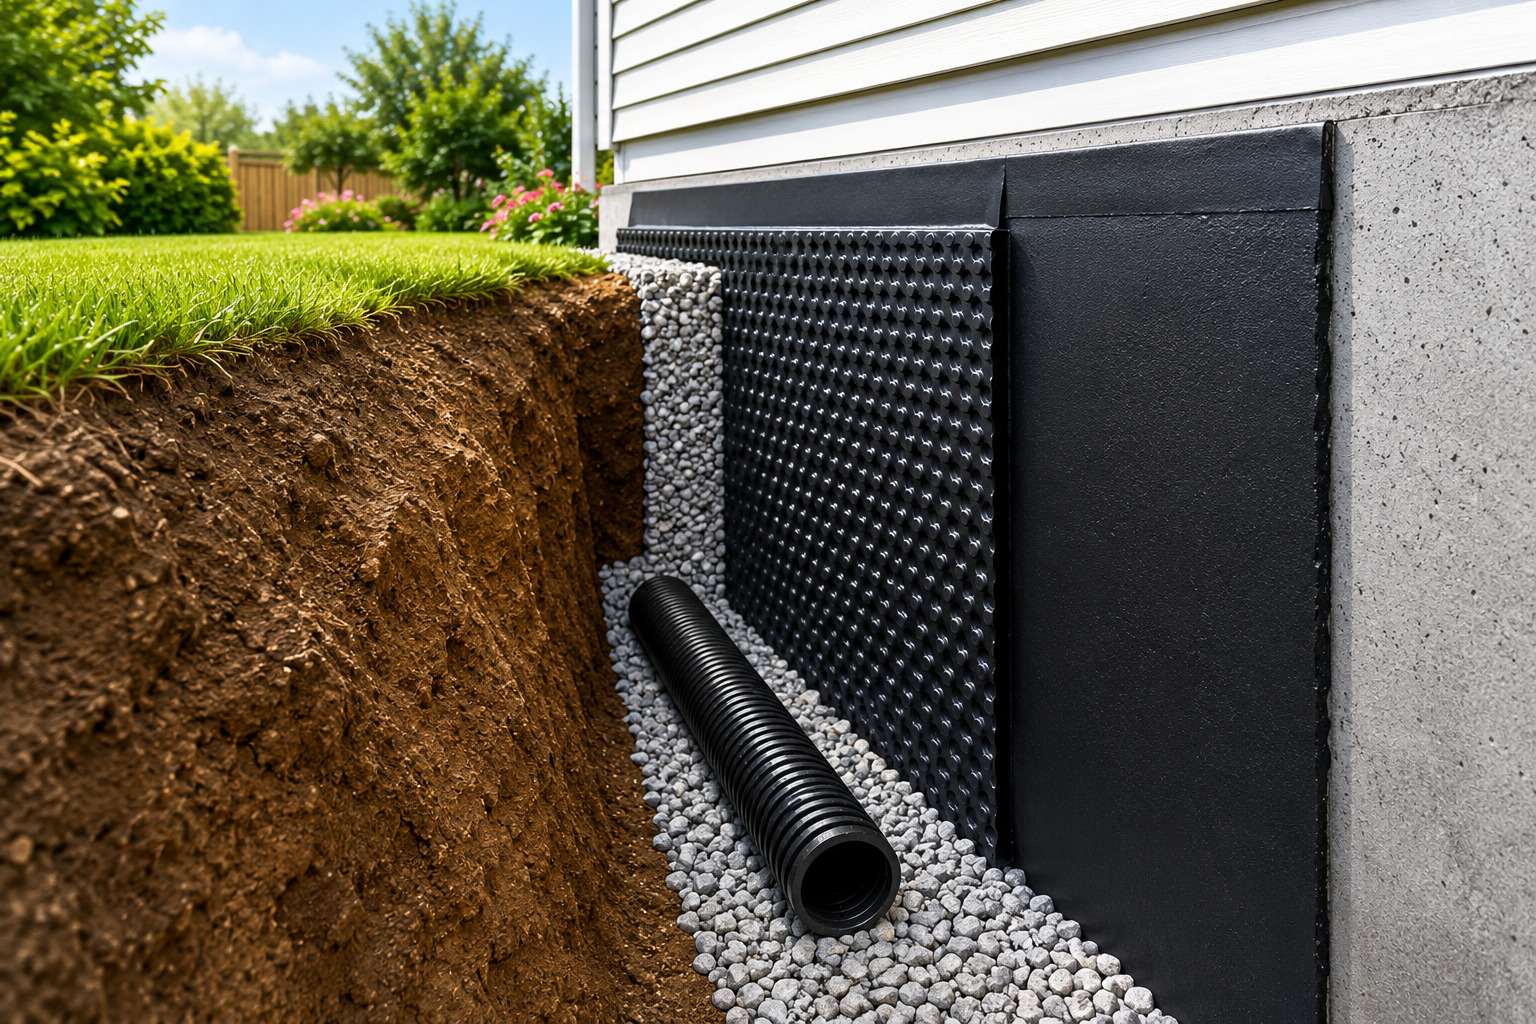
Step 5 — Membrane Application A liquid-applied or sheet waterproofing membrane is applied to the full height of the exterior foundation wall, from the footing up to just above the soil line. Corners and wall-footing joints receive extra attention since these are high-risk areas for water infiltration.
Step 6 — Installation of Drainage Board A dimpled drainage board (typically high-density polyethylene) is installed over the membrane to protect it from backfill damage and to channel water downward to the footing drain.
Step 7 — Footing Drain Installation A perforated pipe wrapped in filter fabric is laid in gravel alongside the footing. It connects to either a gravity outlet or a sump system that pumps water away from the foundation.
Step 8 — Backfilling Clean, well-draining backfill (ideally gravel or a granular mix, not the heavy clay that was excavated) is used to fill the trench. Proper compaction is critical to prevent settlement and future grading issues.
Step 9 — Grading and Restoration The final grade is established to slope away from the foundation. Landscaping, hardscaping, or any disturbed areas are restored. Downspout extensions are checked and extended if necessary.
How Much Does Exterior Waterproofing Cost in 2026?
Cost is one of the most common questions homeowners ask — and for good reason. Exterior waterproofing is not cheap. Here’s an honest breakdown based on current U.S. national pricing data:
| Method | Typical Cost Range (2026) |
|---|---|
| Grading and landscaping corrections | $1,000 – $5,000 |
| Gutter/downspout extensions | $100 – $500 (DIY: under $100) |
| Exterior French drain (footing drain) | $8,000 – $15,000 (full perimeter) |
| Excavation only | $50 – $200 per cubic yard |
| Waterproof membrane (applied to exposed wall) | $4 – $7 per square foot |
| Full exterior excavation + membrane + drain | $10,000 – $20,000+ |
| Window well installation or upgrade | $500 – $2,500 |
The national average for a complete exterior waterproofing project in 2026 sits around $7,000 to $15,000, though complex projects involving large perimeters, significant excavation, or structural repairs can exceed $20,000.
A few region-specific notes for U.S. homeowners:
- Midwest (Chicago, Indianapolis, Columbus): Clay soils drive up costs by 10–20% due to the need for more robust drainage systems. Spring flooding risk is high.
- Northeast (Boston, Philadelphia, New York): Older homes with stone or block foundations often require more prep work. Dense urban settings sometimes limit excavation equipment access.
- Southeast (Atlanta, Charlotte, Raleigh): High humidity and clay soils create chronic moisture issues. Grading corrections alone often make a significant difference here.
- Pacific Northwest (Seattle, Portland): High rainfall and saturated soils make exterior drainage systems particularly important. Expect contractor availability to be tightest in fall and spring.
One important note: Standard homeowners insurance generally does not cover water damage from groundwater seepage. It covers sudden accidental events like burst pipes — not chronic moisture problems. Check whether your policy includes a water backup endorsement, and consider FEMA flood insurance if you’re in a flood zone.
DIY vs. Hiring a Professional: What to Know
Some parts of exterior waterproofing are genuinely DIY-friendly. Others are not.
You can reasonably DIY:
- Grading corrections (adding soil and sloping away from the house)
- Cleaning gutters and extending downspouts
- Installing window well covers and adding gravel drainage inside wells
- Applying exterior waterproofing coatings to exposed foundation walls on shallow foundations
Leave to the professionals:
- Full excavation projects (requires equipment, permits, and experience to avoid damaging utilities or destabilizing the foundation)
- Footing drain installation
- Waterproof membrane application on deep foundations
- Any work that involves structural crack repair or foundation wall stabilization
If you’re in the early stages of diagnosing your problem, start with the free fixes — grading, gutters, downspouts. Many homeowners have solved what seemed like a serious basement water problem by simply redirecting surface water away from the house. You might be surprised.
For a deeper comparison of interior versus exterior approaches, check out our related guide on interior vs. exterior basement waterproofing options where we walk through when each method is the right call.
How to Choose the Right Waterproofing Contractor
If you decide to hire a professional, don’t just go with the first contractor who shows up. Here’s what to look for:
- Licensing and insurance: Make sure they’re licensed in your state and carry both liability insurance and workers’ comp. Ask to see certificates before work begins.
- Specialization: Look for contractors who specialize in foundation waterproofing, not general contractors who do it on the side.
- Written warranty: Reputable contractors offer transferable warranties — meaning if you sell the house, the warranty passes to the new owner. Many established companies offer 25-year or lifetime warranties on their systems.
- Check reviews: Look at Google Reviews, Better Business Bureau ratings, and Angi (formerly Angie’s List) profiles. Pay attention to how the company responds to negative reviews — that tells you a lot about their customer service.
- Permits: Any legitimate contractor doing excavation or foundation work will pull the required local permits. If they suggest skipping permits to save money, walk away.
According to the EPA’s guidance on mold prevention, controlling moisture is the single most effective step in preventing mold growth in homes — reinforcing why proper waterproofing is a health issue, not just a structural one.
Maintenance After Exterior Waterproofing
Exterior waterproofing is not entirely “install and forget.” To get the most out of your investment, build these habits into your annual home maintenance routine:
- Inspect gutters and downspouts twice a year — spring and fall. Clear debris, check for damage, and confirm water is flowing well away from the foundation.
- Walk the perimeter after heavy rain and look for pooling water, soil settlement, or any signs of erosion near the foundation.
- Check window wells annually. Clear them of leaves and debris and confirm the gravel base is still draining properly.
- Have a professional inspect your footing drain every few years if you have one. Over time, roots and silt can clog the pipe.
- Monitor the interior of your basement for any new moisture signs. Catching a small problem early is far less expensive than dealing with a major failure.
Frequently Asked Questions (FAQ)
Q1: Is it better to waterproof a basement from the inside or the outside?
It depends on the source and severity of your water problem. Exterior waterproofing is more effective for stopping water at its source, especially for severe or chronic intrusion caused by hydrostatic pressure. Interior methods — sump pumps, French drains, and sealants — are less invasive and more affordable, and they work well for many existing homes. For new construction or homes with recurring failures of interior fixes, exterior waterproofing is usually the right call. Many professionals recommend addressing exterior drainage (grading, gutters) first before investing in either interior or full exterior systems.
Q2: How long does exterior basement waterproofing last?
Quality exterior waterproofing membranes typically last 20 to 50 years. Rubberized asphalt and liquid-applied polyurethane membranes generally last 20 to 30 years, while crystalline waterproofing treatments that bond chemically into the concrete matrix can last the lifetime of the structure. Exterior French drains last decades if properly installed, though the pipe should be inspected periodically for root intrusion or sediment buildup.
Q3: Can I waterproof my basement from the outside myself?
Partially, yes. Homeowners can handle grading corrections, downspout extensions, and window well improvements on their own — and these steps alone sometimes resolve moisture problems entirely. Full excavation and membrane application, however, require professional equipment, permits, and expertise. Attempting DIY excavation near your foundation without experience can damage utility lines, destabilize the soil, or create new structural problems. For anything beyond surface drainage work, hire a licensed waterproofing contractor.
Q4: How much does exterior basement waterproofing cost in 2026?
In 2026, exterior waterproofing projects in the U.S. typically range from $7,000 to $20,000 or more depending on the scope. Simple grading and drainage corrections can cost as little as $1,000 to $5,000. A full perimeter excavation with membrane application and footing drain installation runs $10,000 to $20,000+ for most homes. Labor costs average around $200 per hour, and excavation alone runs $50 to $200 per cubic yard. Regional pricing varies significantly — homeowners in the Midwest and Northeast often pay more due to soil conditions and older housing stock.
Q5: Will exterior waterproofing damage my landscaping?
Yes, excavation for exterior waterproofing will disturb the soil, plants, and possibly hardscaping (patios, walkways, decks) around your foundation. This is one of the main trade-offs of exterior methods. A reputable contractor will restore grading and basic landscape after the project, but significant landscaping features may need to be rebuilt. Budget an additional $500 to several thousand dollars for landscaping restoration if you have mature plantings or hardscaped areas around your foundation.
Q6: Does homeowners insurance cover exterior waterproofing or basement water damage?
Standard homeowners insurance policies do not cover water damage from groundwater seepage, poor drainage, or hydrostatic pressure. These are considered maintenance issues, not sudden accidents. FEMA flood insurance covers natural flooding events but generally not chronic seepage. Some insurers offer water backup endorsements ($50 to $250 per year) that cover sump pump failure or sewer backup. To protect yourself, invest in waterproofing before a major event — the cost of waterproofing is far less than the cost of flood damage remediation, which can run $5,000 to $30,000 or more.
Q7: How do I know if my basement moisture is coming from outside or from condensation?
Use the foil test: tape a 12-inch square of aluminum foil to a damp area of your basement wall, sealing all four edges completely with waterproof tape. Leave it for 48 hours. If the back of the foil (the side against the wall) is wet, moisture is migrating through the wall from outside — a waterproofing problem. If only the front of the foil (the side facing the room) is wet, it’s condensation from humid indoor air — a ventilation problem, not a waterproofing problem. The fix is completely different, so this diagnostic step is worth doing before spending any money.
Q8: What are the signs that exterior waterproofing has failed?
Watch for reappearing water stains at the base of walls, new cracks that weren’t there before, efflorescence (white mineral deposits) on previously clean walls, soil settlement against the foundation, or water in the basement after heavy rain. Footing drains can fail over time if roots infiltrate the pipe or if the filter fabric becomes clogged with sediment. If you had exterior waterproofing done more than 20 years ago and signs of moisture are returning, it may be time for a re-evaluation and possible system update.
Final Thoughts
Waterproofing your basement from the outside is one of the most significant and long-lasting investments you can make in your home. It’s not cheap, it’s not quick, and it’s not always the first step — but for homes with serious water problems, it’s often the only real solution.
Start with the basics: fix your grading, clean your gutters, extend your downspouts, and walk your perimeter after rain. You might solve 80% of the problem for a few hundred dollars. If that’s not enough, bring in a qualified waterproofing contractor for a proper assessment and get multiple quotes.
A dry basement isn’t just comfortable — it protects your home’s structural integrity, prevents mold, and adds real value when it comes time to sell. Taking action now, before water damage compounds, is almost always the smarter financial decision.