
There’s a particular kind of frustration that comes with a door that won’t close properly. You push it shut, it drags, scrapes, or swings back open on its own — and every single time, it reminds you that something needs fixing. The good news is that a sagging door is one of the most common home repair problems, and in most cases, it’s also one of the easiest to fix yourself.
You don’t need to be a contractor. You don’t need to replace the door. In many cases, a screwdriver and 15 minutes is all it takes.
This guide walks you through exactly why doors sag, how to diagnose the specific cause in your home, and five proven repair methods — from the simplest tightening fix all the way to planing and frame correction — so you can get your door swinging smoothly again.
Why Do Doors Sag? Understanding the Root Cause
Before you grab a tool, it helps to understand what’s actually happening when a door sags. Most doors hang from two or three hinges mounted to the door jamb. Every time you open the door, gravity pulls the free end — the latch side — downward. That constant force concentrates on the screws holding the top hinge to the frame.
Over months and years of daily use, those screws gradually loosen or strip out of the wood, allowing the top corner to drop and the bottom latch-side corner to drag against the floor or strike the frame in the wrong place.
A standard hollow-core interior door weighs roughly 25 to 30 pounds. A solid-core or exterior door can weigh 50 pounds or more — and heavier doors strip hinge screws significantly faster, especially in homes with kids who hang or swing on doors.
Beyond loose screws, here are the other common causes of door sagging:
Stripped Screw Holes The wood fibers around the original screws have been compressed and can no longer grip the threads. The screw goes in but spins without tightening — a classic sign of this problem.
House Settling As a home’s foundation shifts gradually over the years — which is completely normal in most U.S. climates — door frames can move slightly out of square. This changes the geometry the door was originally fitted to, and the result is a door that sticks, binds, or gaps unevenly.
Moisture and Humidity Wood expands when it absorbs moisture and contracts when it dries out. In humid climates — particularly the Southeast and coastal regions — this seasonal swelling is one of the leading causes of doors that stick in summer and loosen in winter. Exterior doors and bathroom doors are especially vulnerable.
Paint or Debris Buildup Behind Hinges After years of repainting, paint can accumulate behind the hinge leaf, preventing it from sitting flush in its mortise. This pushes the hinge outward and throws the door out of alignment.
Worn or Damaged Hinge Spacers Some doors are installed with hinge shims or spacers for fine-tuned alignment. Over time, these can shift, compress, or deteriorate — subtly changing the door’s hang angle.
Foundation or Structural Issues In rarer cases, multiple doors sticking simultaneously — combined with visible cracks in drywall near door frames or corners — can signal foundation movement. This is a different and more serious problem that requires a structural engineer, not a screwdriver.
How to Diagnose Your Sagging Door
Before jumping into repairs, spend two minutes diagnosing exactly what’s going on. This saves you time and ensures you’re fixing the right thing.
Step 1: Observe the Gap Close the door slowly and look at the gap between the door edge and the frame on all four sides. An even gap of about 1/8 inch all the way around is the goal. If the gap is wider at the top on the latch side and tighter (or nonexistent) at the bottom latch side, the door is sagging — the top corner has dropped.
Step 2: Check for Floor Contact Note whether the door is scraping the floor or threshold. If it drags across the bottom, the sag is significant enough that the door has dropped below its original hang height.
Step 3: Test the Hinges Open the door to 90 degrees and grab the latch side. Try gently lifting it up and wiggling it. If there’s noticeable play or movement, the hinges — and likely the screws — are the source of the problem.
Step 4: Inspect the Screws Look closely at each hinge screw. If any appear partially backed out, or if they spin without tightening when you try to snug them, you have loose or stripped screws.
Step 5: Check Behind the Hinges Look at how the hinge leaf sits in its mortise (the recessed cutout in the frame). If you can see paint buildup underneath, or if the hinge leaf stands slightly proud of the surrounding wood rather than sitting flush, that’s your issue.
Once you’ve identified the problem, pick the repair method that matches it below.
What You’ll Need: Tools and Materials
Most sagging door repairs require minimal supplies. Here’s what to have on hand before you start:
Tools:
- Flathead and Phillips screwdriver (manual, not a drill — more on this below)
- Drill with bits (for stripped hole repairs)
- Putty knife or chisel
- Hand plane or electric planer (for planing fixes only)
- Sandpaper (80 and 120 grit)
- Level
- Pencil or painter’s tape for marking
Materials:
- 3-inch #10 wood screws
- Wood glue
- Wooden toothpicks or 3/8-inch wooden dowels
- Thin cardboard or playing cards (for shimming)
- Door shims
- Paint or primer (if you plane or sand wood edges)
Estimated Cost: $5–$65 depending on which repair method your door needs. Most simple hinge fixes cost next to nothing.
Time Required: 15 minutes to 3 hours, depending on severity.
Method 1: Tighten the Hinge Screws (Fix #1 — Try This First)
This is the right starting point for almost every sagging door. It solves the problem roughly half the time and costs nothing.
Step 1: Open the door to about 90 degrees to give yourself easy access to the hinges.
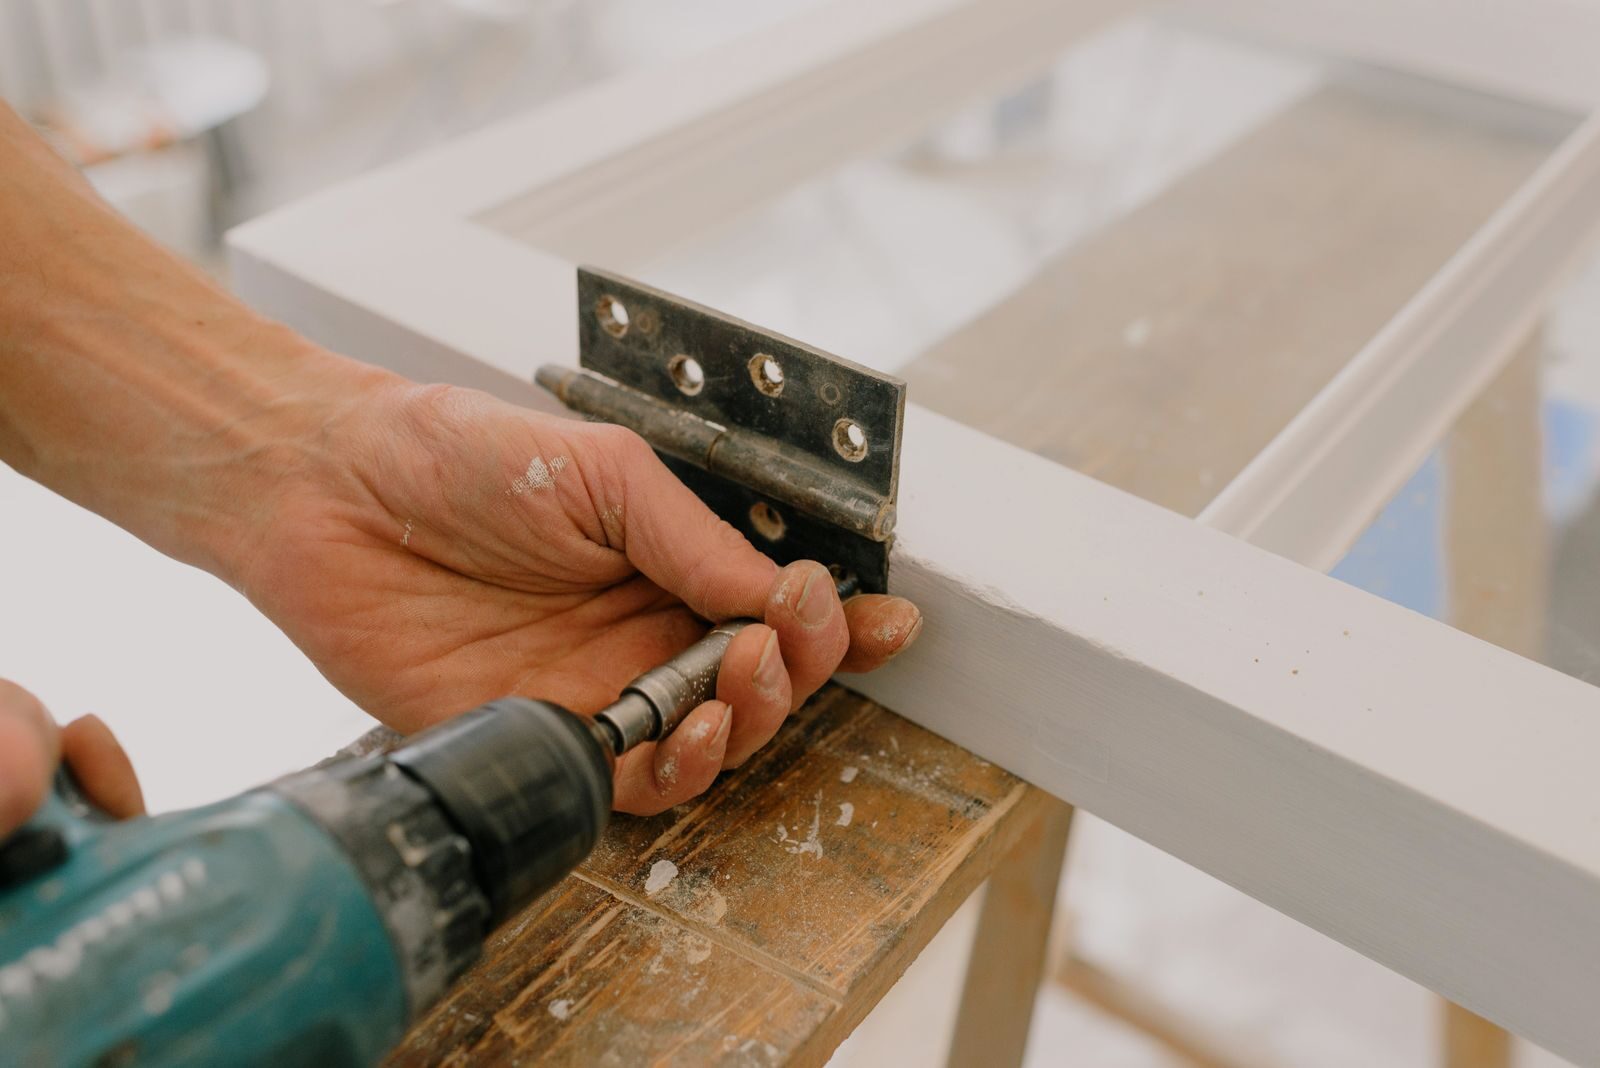
Step 2: Starting with the top hinge — which carries the most load and is almost always where trouble begins — use a manual screwdriver to tighten every screw on both the door-side leaf and the frame-side leaf. Work through any screw that feels loose before moving on.
Step 3: Check the middle hinge (if present) and the bottom hinge as well. A loose screw anywhere contributes to misalignment.
Step 4: Close the door and test. If the gap is now even and the door latches without resistance, you’re done.
One important note: use a manual screwdriver, not a power drill. A drill makes it very easy to overtighten and strip the screw holes — which turns a simple fix into a more involved repair. Take your time and tighten by hand.
Method 2: Replace Short Screws with 3-Inch Screws (Fix #2 — The Game Changer)
If tightening alone doesn’t hold, the original screws may simply be too short to do the job properly. Many doors are installed with 3/4-inch to 1-inch screws that only penetrate the door jamb — they never reach the structural wall stud behind it. Without that stud connection, there’s nothing solid anchoring the hinge.
Replacing just one or two screws with 3-inch #10 wood screws can transform a chronically sagging door.
Step 1: Open the door and support it — prop something under the latch edge to take the weight off the hinges.
Step 2: Remove one screw at a time from the top hinge’s frame-side leaf. Do not remove all the screws at once or the door will fall.
Step 3: Drive a 3-inch #10 wood screw into the same hole. This screw will pass through the 3/4-inch jamb and bite at least 1.5–2 inches into the structural stud behind it, pulling the entire hinge and frame tighter against the framing.
Step 4: Drive it slowly and steadily. Stop when the hinge plate is snug against the jamb — do not overtighten.
Step 5: Replace the center screw on the top hinge first, as this location offers the most direct path into the stud. Then close and test the door. In many cases, this single screw is enough to pull the door back into alignment.
Method 3: Fix Stripped Screw Holes (Fix #3 — When Screws Spin Without Gripping)
If a screw just keeps spinning when you try to tighten it, the wood fibers around the hole have been stripped and can no longer grip the threads. You need to rebuild that wood before the screw will hold.
There are two approaches depending on your door type. Choose the one that fits your situation.
Option A: Toothpick Method (Best for Lighter Interior Doors)
This is the fastest fix and works well on hollow-core interior doors weighing under 35 pounds.
A1: Remove the hinge screw from the stripped hole.
A2: Dip 3–5 wooden toothpicks in wood glue and pack them tightly into the stripped hole.
A3: Break or trim the toothpicks off flush with the surface.
A4: Let the glue dry for at least one hour.
A5: Reinsert the original screw (or a slightly longer one). The wood glue and toothpick material gives the threads something solid to grip.
Option B: Wooden Dowel Method (Best for Heavy or Exterior Doors)
For solid-core or exterior doors weighing 50 pounds or more, toothpicks may not provide enough holding strength. The dowel method creates a much more durable anchor and is worth the extra few minutes.
Step 1: Drill out the stripped hole with a 3/8-inch drill bit to a depth of about 1 inch.
Step 2: Apply wood glue to a 3/8-inch wooden dowel and tap it into the hole. Trim flush once dry.
Step 3: Wait at least one hour for the glue to fully cure.
Step 4: Drill a 1/8-inch pilot hole through the center of the dowel, then drive your screw in. You now have a solid wood plug rather than compressed fibers — far stronger than the original hold.
Method 4: Shim the Hinge (Fix #4 — When the Mortise Is Too Deep or Too Shallow)
Sometimes the problem isn’t loose screws — it’s that a hinge leaf is sitting at the wrong depth in its mortise. There are two versions of this problem, and each has a slightly different fix.
Option A: Hinge Sits Too Deep (Add a Shim)
If the original installer routed the mortise too aggressively, the hinge leaf sits below the surface of the jamb, tilting the door out of alignment. You’ll fix this by adding a thin cardboard shim behind the hinge to raise it back to the correct depth.
B1: Remove the hinge screws and take the hinge leaf out of the mortise.
B2: Cut a piece of thin cardboard — a cereal box, manila folder, or playing card works well — to match the shape of the hinge leaf exactly.
B3: Place the cardboard shim into the mortise, then reinstall the hinge over it and retighten the screws.
B4: A single layer of standard cardboard provides approximately 1/16 inch of correction, which resolves most minor misalignments. Stack two layers if you need more.
Step 5: Close and test the door. The gap along the frame should now be more even.
Option B: Paint Buildup Pushing the Hinge Out (Remove the Buildup)
After multiple coats of paint over the years, paint can accumulate in the mortise and push the hinge leaf outward — the opposite problem. The hinge stands slightly proud of the surrounding wood rather than sitting flush.
Step 1: Remove the hinge screws and lift the hinge leaf out of the mortise.
Step 2: Use a putty knife or sharp chisel to carefully scrape all accumulated paint from the mortise recess. Work gently to avoid gouging the wood.
Step 3: Reinstall the hinge and retighten the screws. The hinge leaf should now sit flush with the surrounding surface.
Step 4: Close the door and test alignment. If the door now closes evenly, the paint buildup was your culprit.
Method 5: Plane or Sand the Door Edge (Fix #5 — When the Door Still Rubs)
If you’ve addressed the hinges and the door still scrapes the floor or rubs the frame at a specific point, the door itself may need to be trimmed. This is typically needed when moisture has caused wood swelling, or when house settling has permanently altered the frame geometry.
Step 1: Close the door and mark the exact contact point with a pencil or painter’s tape. Be precise — you want to remove only what’s necessary.
Step 2: Remove the door from its hinges. Have a helper hold it while you remove the hinge pins. Lay the door flat on sawhorses or a workbench.
Step 3: For minor rubbing (less than 1/8 inch), 80-grit sandpaper or a hand plane is sufficient. Work the marked area in long, even strokes parallel to the grain.
Step 4: For more material removal, an electric hand planer speeds up the process. Take light passes and check frequently — you can always remove more, but you can’t put it back.
Step 5: Once the door fits correctly, this step is critical: seal or paint any planed or sanded edges immediately, especially on exterior doors. Bare wood absorbs moisture rapidly and the swelling will return within weeks if you skip this.
Step 6: Rehang the door and test before the paint dries, so you can make small adjustments if needed.
Fixing a Sagging Exterior Door
Exterior doors face unique challenges. They’re heavier than interior doors, exposed to weather extremes, and need to seal properly for both energy efficiency and security.
If your exterior door is sagging, start with Methods 1 and 2 above — tightening and replacing screws with 3-inch versions. These fixes work particularly well on heavy exterior doors because the longer screws bite deep into the structural framing and provide a much more stable anchor.
For moisture-related swelling on exterior doors, identify which seasons cause the problem. If the door sticks only in summer, humidity is almost certainly the cause. Planing a small amount off the sticking edge and immediately sealing it with exterior primer and paint resolves the issue in most cases.
Also check the threshold and door sweep. A sagging exterior door often drags on the threshold, damaging both the door bottom and the weatherstripping. After realigning the hinges, inspect the sweep and replace it if it has been damaged by dragging — replacement sweeps typically cost $10–$20 at any hardware store.
For more detailed guidance on exterior door maintenance, the U.S. Department of Energy’s Energy Saver resource on door weatherization covers how door alignment affects your home’s energy efficiency and what to look for.
How to Align the Strike Plate After Fixing the Sag
Once you’ve addressed the hinge issue, there’s one more thing to check: the strike plate. When a door has been sagging for a while, the latch may have worn a groove or rub mark in the strike plate at the wrong height. Even after the door is realigned, it may not latch smoothly if the strike plate isn’t in the right position.
Check the alignment: Close the door and observe whether the latch bolt hits the center of the strike plate opening. If it strikes too high or too low, the plate needs adjustment.
Quick fix: Use a metal file to enlarge the strike plate opening slightly in the direction the latch is hitting. This is faster than moving the plate and avoids the need to fill and redrill holes. File in small increments and test frequently.
For larger corrections: Remove the strike plate, fill the old screw holes with toothpicks and wood glue, let dry, then remount the plate in the correct position and re-drill pilot holes.
When to Call a Professional
Most sagging door repairs are genuinely DIY-friendly. But there are situations where calling a licensed handyman or carpenter is the smarter move.
Consider bringing in a professional if:
- You’ve tried Methods 1 through 4 and the door still sags or binds
- The door frame itself appears visibly warped, twisted, or rotted
- Multiple doors in your home are sagging simultaneously, especially alongside drywall cracks near door frames or windows — this may indicate foundation movement requiring a structural engineer
- The door is a fire-rated door (common between garages and living spaces) that requires code-compliant installation
- The door needs to be replaced entirely due to warping, severe rot, or structural damage
A local handyman typically charges $75–$150 for a sagging door repair, including hinge adjustment and minor planing. That’s a reasonable investment if you’ve exhausted DIY options or simply don’t have the time. You can also explore our home maintenance checklist for seasonal DIY tasks to stay ahead of common repairs before they become bigger problems.
How to Prevent Door Sagging in the Future
Once you’ve fixed the door, a little ongoing maintenance will keep it working smoothly for years.
Tighten hinge screws annually. Walk through your home once a year and give each hinge a quick check. Any screw that turns even slightly without resistance needs to be snugged down before the problem escalates.
Control indoor humidity. Keep relative indoor humidity between 30–50% using your HVAC system or a dehumidifier, especially in humid climates. This single habit does more for your doors than any other preventive measure.
Seal all door edges. When repainting interior or exterior doors, seal all six sides — including the top and bottom edges that are rarely visible. These unsealed edges absorb moisture and are where seasonal swelling most often begins.
Don’t hang heavy items on doors. Over-the-door hooks loaded with heavy coats, bags, or towels add constant stress to the top hinge. Use wall hooks or a coat rack instead.
Don’t let children swing on doors. This is one of the most common causes of sagging in family homes, and the damage accumulates much faster than most parents realize.
Use three hinges on heavy doors. Any door that is solid-core, taller than 80 inches, or has glass inserts should be hung on three hinges rather than two. The third hinge distributes weight more evenly and dramatically reduces the stress on the top hinge.
Lubricate hinge pins annually. Apply a dry silicone spray or a small amount of graphite powder to hinge pins once a year. Avoid heavy oils — they attract dust and can stain surrounding wood over time.
Cost Summary: DIY vs. Professional Repair
| Repair Method | DIY Material Cost | Time Required | Pro Cost |
|---|---|---|---|
| Tighten hinge screws | $0 | 10–15 min | $75–$100 |
| Replace with 3-inch screws | $3–$5 | 20–30 min | $75–$100 |
| Fix stripped holes (toothpick) | $2–$5 | 30–45 min | $100–$125 |
| Fix stripped holes (dowel) | $5–$10 | 45–60 min | $100–$125 |
| Shim the hinge | $0–$3 | 20–30 min | $75–$100 |
| Plane/sand door edge | $10–$40 | 1–3 hours | $125–$175 |
| Full door replacement | $150–$800+ | Half day+ | $300–$700+ |
FAQ: How to Fix a Sagging Door
1. What causes a door to sag suddenly?
A sudden sag — rather than one that develops gradually — is most often caused by a screw that has finally pulled free from a stripped hole, or by a hinge pin that has worked its way up and out of the barrel. Check the top hinge first. If a screw has backed out completely or the hinge pin is partially out, that’s your culprit. Reset the pin, replace the screw with a longer one, and the door should return to normal position immediately.
2. Can I fix a sagging door without removing it from the frame?
Yes, and you should try to do so. Methods 1 through 4 in this guide — tightening screws, upgrading to 3-inch screws, fixing stripped holes, and shimming the hinge — are all performed with the door in place. Only Method 5 (planing or sanding) requires removing the door from its hinges, and that’s only necessary if the door itself is physically rubbing the floor or frame after the hinges have been corrected.
3. Why does my door sag only in summer?
Seasonal sagging that appears in summer and resolves in winter is almost always caused by wood expansion from humidity. As indoor and outdoor moisture levels rise in warmer months, the wood in the door and frame absorbs moisture and swells. The fix is two-part: plane a small amount of material from the sticking edge, then immediately seal that bare wood with primer and paint to prevent it from absorbing moisture again. Also consider running a dehumidifier or keeping your HVAC running to maintain indoor humidity between 30–50%.
4. How do I fix a sagging door if the screws won’t tighten?
Spinning screws that won’t grip are a sign of stripped screw holes. The fastest fix is the toothpick method: pack 3–5 toothpicks dipped in wood glue into the hole, break them off flush, let the glue cure for an hour, and then reinsert the screw. For heavy or exterior doors, the wooden dowel method — drilling out the hole, gluing in a 3/8-inch dowel, and re-drilling — provides a stronger and more durable repair.
5. Should I be worried if multiple doors in my house are sagging at the same time?
Multiple doors sagging simultaneously can occasionally signal foundation settling, especially if you also notice new cracks in drywall near door frames, windows that no longer open smoothly, or visible gaps between walls and ceilings. Normal, gradual house settling over decades is common and rarely serious. However, if the changes are sudden or accompanied by structural cracking, consult a licensed structural engineer for an assessment. A foundation inspection typically costs $300–$500 and provides clarity on whether you have a minor issue or something that needs attention.
6. How long does it take to fix a sagging door?
The simplest repair — tightening hinge screws — takes about 10 to 15 minutes. Replacing screws with longer 3-inch versions adds another 15 minutes. Fixing stripped screw holes takes 30 to 60 minutes including glue drying time. Planing or sanding the door edge, which requires removing the door, takes 1 to 3 hours depending on how much material needs to be removed. In most homes, the entire repair from diagnosis to testing is completed in under an hour.
7. What size screws should I use to fix a sagging door?
Use 3-inch #10 wood screws for the frame-side hinge leaves. This size passes through the door jamb (approximately 3/4 inch thick) and penetrates at least 1.5 to 2 inches into the structural wall stud behind it. Standard hinge screws are typically 3/4 to 1 inch — they grip only the jamb and have no connection to the framing, which is why they eventually fail. For the door-side hinge leaves, the original shorter screws are typically fine, since those go into solid door material rather than a jamb.
8. When should I replace the door instead of repairing it?
Repair makes sense for the vast majority of sagging doors — especially when the cause is loose hinges, stripped screws, or minor swelling. Consider full replacement when the door has extensive wood rot or decay that compromises its structural integrity, when it has warped so severely that no amount of planing will produce an even gap, when the frame itself is badly damaged, or when a very old door has lost its weatherstripping, insulation value, and security hardware to the point where replacement is more cost-effective than cumulative repairs. A new pre-hung exterior door system typically costs $150–$800 for the unit itself, plus $150–$400 for professional installation.
Final Thoughts
A sagging door is annoying, but it’s almost never a crisis — and in most cases, it’s something you can genuinely fix yourself in under an hour with tools you already own.
Start with the simplest fix: tighten the hinge screws. If that doesn’t hold, upgrade to 3-inch screws that anchor into the wall stud. If screws won’t grip, rebuild the holes with toothpicks or a dowel. Work through the methods in order, and the large majority of sagging doors will be resolved before you ever need to pick up a plane.
The one thing homeowners consistently regret? Waiting. A door that drags just a little today strips its screw holes a little more each time it’s used. The same repair that takes 15 minutes now may take 2 hours in six months. When you notice the problem, fix it — and do the annual hinge check that keeps it from coming back.